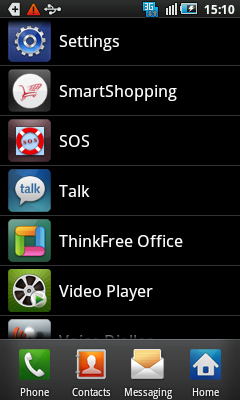
 To launch the SOS-App tap MENU to get a list with all apps, scroll to SOS-App and tap the SOS-App entry.
How to use SOS-App
To launch the SOS-App tap MENU to get a list with all apps, scroll to SOS-App and tap the SOS-App entry.
Whenever you launch SOS, the license is checked first. If the license is not valid you are informed and you have the chance to open the SOS-App's detail page on the Android market to buy the license. In more recent Android versions you have to grant additionally the necessary access permissions before SOS-App can proceed.
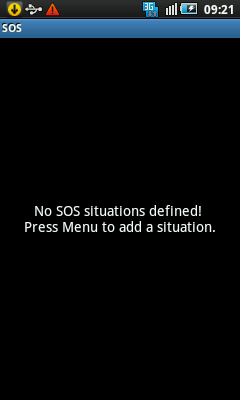 If you launch SOS-App for the first time or if no situations are defined, you see that text on the display.
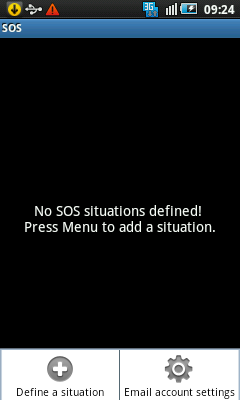 Press the MENU button to open the SOS-App menu and choose DEFINE A SITUATION to create a new situation.
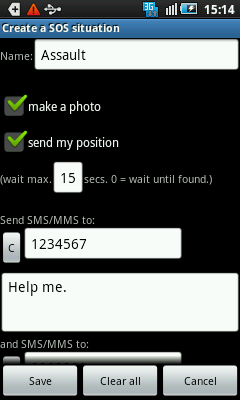 The situation's window opens up. Enter a name for the situation. This name is used as title of the activation button and as subject for the emails. The max. length of name is 40 characters.
Check the MAKE A PHOTO box to make a photo in case of emergency.
Check the SEND MY POSITION box to send your current position in case of emergency. SOS-App uses wireless network and/or GPS satellites to fix your position, whichever is defined in the settings of your smartphone and whichever provides first the position. If you check this box, enter the max. waittime in the corresponding field to avoid blocking of the other activities. If your position cannot be fixed within this period, the other activities are executed without your position. A value of 0 sets an infinite timeout: all other activities are not executed before the position is fixed. Therefore this value is not recommended.
If you want to send SMS, enter up to 3 SMS numbers and the corresponding texts. If the text field is empty, the SMS will not be sent. Tap the "C" button in front of the SMS address field to choose an entry of the list of your contacts.*
If the SEND MY POSITION box is checked and the position is fixed in time, the lattitude and longitude and the accuracy of the position (if delivered by your smartphone) are appended to the SMS.
*Automatic sending of SMS is in the current version of this app no longer possible since forbidden by Google. The corresponding fields are no longer shown in the app.
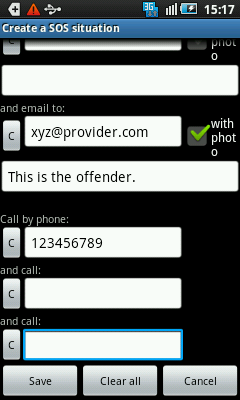 If you want to send emails, enter up to 3 email addresses and the corresponding texts. The email is sent also without text. Tap the "C" button in front of the email address field to choose an entry of the list of your contacts. Attention: some contacts apps don't display email lists. If no list can be launched, you are informed.
If you want to append the photo to the email, check the WITH PHOTO box to the right. Of course, to append the photo, the MAKE A PHOTO box must be checked too (see above).
The subject field of the email is filled with the name of the situation.
If the SEND MY POSITION box is checked and the position is fixed in time, the lattitude and longitude and the accuracy of the position (if delivered by your smartphone) are appended to the subject of the email.
If you want to call someone, enter up to 3 phone numbers. Tap the "C" button in front of the phone number field to choose an entry of the list of your contacts. Attention: all the phone numbers are dialed in sequence without respect to the result of the call (e.g. connected or not connected).
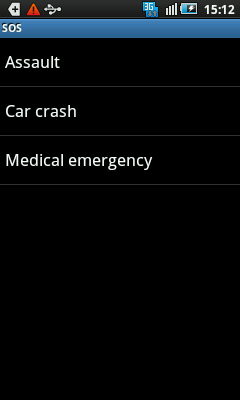
When you have defined up to 3 situations you see the list with the situations on the display
 Now you can activate a situation for emergency cases.
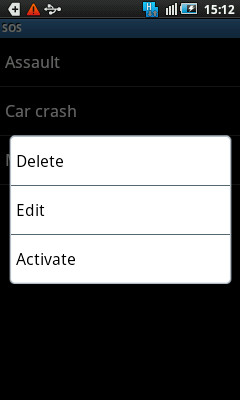 Tap and hold the situation you want to activate. The context menu is displayed. Choose ACTIVATE to activate the corresponding activity.
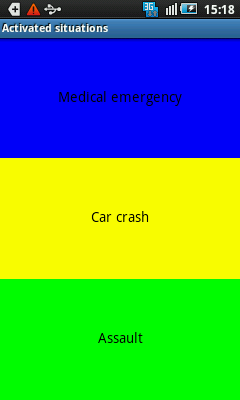
The first situation in the list of situations will always have green colour in the activation window. The second situation in the list will be yellow and the third will be blue.
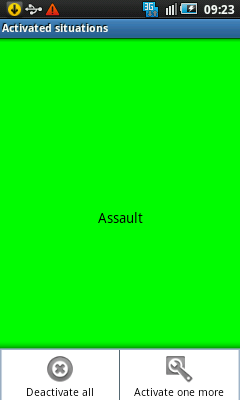 If only one situaution is activated it fills the whole display. If two situations are activated each one fills the half display and for three activated situations each fills one third.
To activate one more situation, press MENU when the activated situations are displayed and choose ACTIVATE ONE MORE. A list with all not yet activated situations comes up. Tap the situation you want to activate additionally.
Hint: you can influence the display sequence of the activated situations. The first activated situation is the upmost (or leftmost) situation on the display. The next activated situation is in the middle and the last activated situation is below (or to the right). But the first situation of the situations' list is always green, the second yellow and the third blue no matter in which sequence they were activated.
Initiating the execution of the situations's activities
 All activated situations are displayed with their colour. To initiate the execution of the activities of a situation in case of emergency, tap the area of the corresponding situation. During the execution of the activities, the display is grayed and no situation can be initiated. When all activities are finished, a notification is shown with the sum of the executed activities and the situations on the display are shown in their original colour and can be initiated again.
If you had decided to make a photo, the first executed activity is the launch of the camera app. Make the photo, store it and finish the camera app (if not finished automatically). Then the other activities will be executed automatically.
Deactivating situations, stopping executing situations
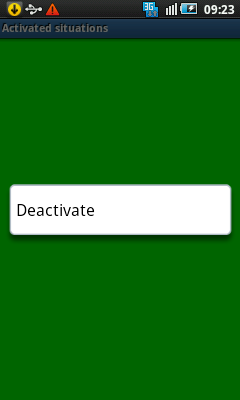
To stop a initiated situation you must press MENU when the activated situations are displayed. You can press MENU even if the display is grayed. Choose DEACTIVATE ALL. All running activities are stopped, all situations are deactivated and the list of the defined situations is displayed.
If no situation is initiated, tapping DEACTIVATE ALL deactivates all activated situations and the list of the defined situations is displayed.
 To deactivate one situation of all the activated situations, tap and hold the corresponding situation and choose DEACTIVATE. The corresponding situation is deactivated. If there are still other activated situations they continue to be displayed as activated situations. If no more situations are activated the list of the defined situations is displayed.
during the execution of the activities of a initiated situation, you cannot deactivate one situation this way. Instead you can only deactivate all activated situations at once (see above).
To edit or delete a situation, the list of situations must be displayed. Therefore, if one or more situations are activated, you must first deactivate all to display the list of situations (see above). Then tap and hold the situation you want to edit or delete and choose the corresponding function.
If you intend to send emails in an emergency situation, you have to specify the email account to be used for sending emails. Since the current Android platform does not allow to use the email accounts of the email app without user interaction, you must enter the necessary data in the SOS-App.
To edit the email settings, the list of situations (or the empty list) must be displayed. Therefore, if one or more situations are activated, you must first deactivate all to display the list of situations (see above). Then press MENU and choose EMAIL ACCOUNT SETTINGS. You can enter the email settings at any time: before the first situation is defined or after all situations are defined or in the middle.
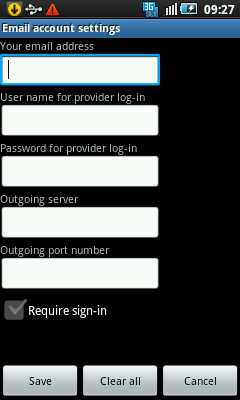 All fields are necessary. If you don't know what to enter, call the email app, choose the email account you want to use in SOS-App, then press MENU, choose settings and copy the corresponding data from that account to the email account in the SOS-App. In the current version of SOS-App you have to check additionally if your server requires SSL.