/ Usage
How to use Radioactivity-Meter
- Preparing the smartphone
- Launching Radioactivity-Meter
- The menu of Radioactivity-Meter
- Calibration
- Calibration: Zero point
- Calibration: Gauge value
- Metering
- Best practice
- Logging
Preparing the smartphone
The most important part for the start condition of a measurement is the camera image. During the measument absolutely no incident light is allowed for the camera. Therefore the camera lens must be sealed e.g. by a black insulating tape. To avoid contamination of the lens by adhesive, mask the lens with a small piece of paper before you seal the lens by the tape. Of course you can keep the lens shut by your finger, but sometimes a little light shines through the fingers. In this case use at least additionally a cloth to shut the lens.
During the measurement a preview of the camera image is shown above the indicator area of Radioactivity-Meter (in portrait mode) or to the left (in landscape mode). This preview must be black, without any image. If you see any image or image contours, the lens is not shut sufficiently and the result of the measurement will be wrong!
Launching Radioactivity-Meter
To launch the Radioactivity-Meter App tap MENU to get a list with all apps, scroll to Radioactivity-Meter and tap the Radioactivity-Meter entry. If Radioactivity-Meter is started the first time, the end-user license agreement is shown. You must accept the agreement once, to continue. If you refuse the agreement, Radioactivity-Meter is terminated. In more recent Android versions you have to grant additionally the necessary access permissions before
Radioactivity-Meter can proceed.
The menu of Radioactivity-Meter
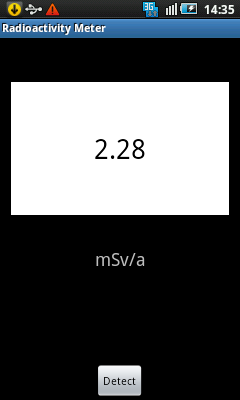
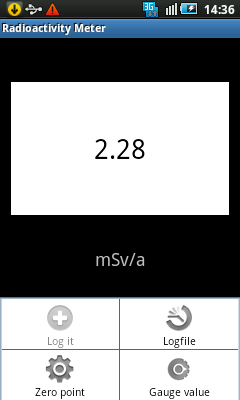 The Radioactivity-Meter has an indicator area, where the measuring values are displayed and below this area the unit of these values is indicated. Tap MENU to display the main menu of Radioactivity-Meter.
LOG IT appends the current measuring value to the log. For each measurement, you can appent the value only once to the log.
LOGFILE displays a list with all logged entries. You can delete or export the entries.
ZERO POINT calls the zero point calibration.
GAUGE VALUE calls the gauge value calibration.
Calibration
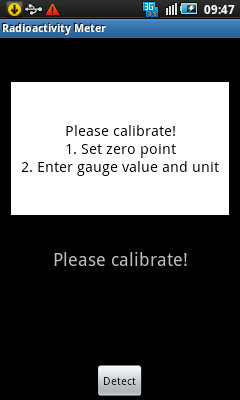 When Radioactivity-Meter is started, you see the indicator area and below this area the unit of the indicated values. But before zero point and gauge value are set, a notice is displayed to remind you, to calibrate Radioactivity-Meter.
This notice depends on the missing part(s) of calibration and is also displayed in the units area.
Calibration: Zero point
 The zero point is the point, where the internal noise is not influenced by any radioactive radiation and which is measured at a temperature lower than the temperature of all future measurements. So, no radioactivity should be caught by the camera. Therefore the best method to measure the zero point is to put the smartphone in a leaden container. If you have no leaden container, put it in a cast-iron roasting tray or in another, well shielded container. Don't forget to close the container.
Attention: Some cast-iron container themselves have a -very low - radioactive radiation and therefore are not suited to measure the zero point.
VERY IMPORTANT: Switch on the flight mode of your smartphone to avoid increase of transmission power of the smartphone, when from within the shielded container no connection to the provider net is possible. Since the smartphone heats in the container, it should not be too long in the container to avoid tampered values.
Since zero point has to be set at the lowest temperature, give the smartphone time to cool down to the ambient temperature because the temperature meant is the temperature inside of the smartphone not the ambient temperature.
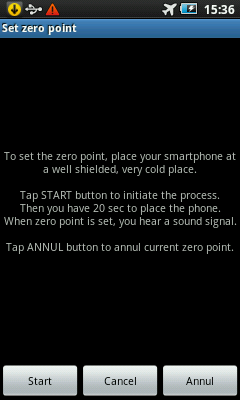
To fix this zero point, first terminate the "Radioactivity-Meter" on your smartphone. Change the display timeout to a large value (e.g. 15 minutes) to avoid later, in flight mode, a potential license check. Start the "Radioactivity-Meter" again to let it check the license, then switch with the HOME and MENU button to "settings", set flight mode to "on" and return to the "Radioactivity-Meter". Put the leaden container and the smartphone in a fridge or, if you want to use Radioactivity-Meter in winter at low temperatures, in a freezer. Do not yet put the smartphone into the container. Wait some minutes (e.g. 10 minutes) until container and smartphone cooled down to the deep temperature. Then tap MENU in Radioactivity-Meter and choose ZERO POINT. You will see this screen. Tap START to initiate the calibration process. A progress bar indicates the 20 seconds, you have to place the smartphone at a shielded place. During this time, put the smartphone into the container in the fridge/freezer. After these 20 seconds, the zero point value is measured. During the measurement, another progress bar indicates the progress of the measurement process (which, of course, is invisible for you). When the measurement is finished, a sound signal is played to inform you, to remove the smartphone from the container. Remove it from the container. If the measurement was successful, terminate "Radioactivity-Meter", reset the display timeout to its original value and switch off flight mode where required.
You can fix first the zero point and then measure the gauge value or reverse. If you have measured the gauge value first and the zero point is higher than the gauge value, an error message is displayed and the zero point is not set.
If the zero point you fixed was not the real zero point but a point with some radioactive radiation present, all future measurement values are wrong. Therefore Radioactivity-Meter adjusts automatically the zero point in case it is sure that the temperature and value are suited for zero point: the zero point will be set to this lower value.
You can repeat zero point calibration at any time. The new value overwrites the recent value. To reset and annul the recent zero point, tap ANNUL, henceforth the zero point is not yet set.
Calibration: Gauge value
 To set the gauge value is necessary to tell Radioactivity-Meter the relation between the absolute values and units of the radioactivity and the internal values. The simplest way is to use the current radioactivity at your place. Try to find out the official current radioactivity, measure the corresponding value with your smartphone and assign the official value and unit to the internal value. You can get the current radioactivity from the internet, from newspaper or from a competent public authority.
Due to the inaccuracy and the stochastic nature of the measurement, the higher the gauge value the better for the accuracy of the future measurements. Since the natural radioactivity is normally (fortunately) small, you could try to gauge your Radioactivity-Meter with a higher gauge value by e.g. asking the physics department of an university for using its radioactive samples to calibrate the Radioactivity-Meter. ATTENTION: Of course, the radiactive radiation must not be too high, to avoid damage of your smartphone!
Evaluate the gauge value under the same start conditions you will use for the future measurements.
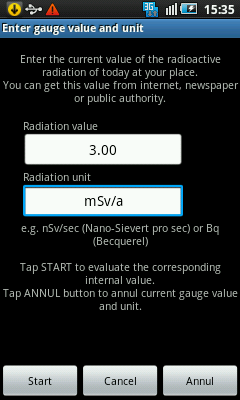
To set the gauge value, tap MENU in Radioactivity-Meter and choose GAUGE VALUE. You will see this screen. Enter the current official value and unit of the radioactivity in the corresponding fields. Then tap START to initiate the measurement of the internal value. A progress bar indicates the progress of the measurement process. When the measurement and the assignment of official and internal values are finished, you are informed about the successful setting of the gauge value.
You can fix first the zero point and then measure the gauge value or reverse. If you have fixed the zero point first and the gauge value is lower than the zero point, an error message is displayed and the gauge value is not set.
You can repeat gauge value calibration at any time. The new value overwrites the recent value. To reset and annul the recent gauge value, tap ANNUL, henceforth the gauge value is not yet set.
Metering
 Before you measure the radioactivity, the smartphone should be a few minutes in the environment or close to the object, you want to meter.
Then tap DETECT to start the measurement process. A progress bar indicates the progress of the measurement process. During the measurement, the indicator area is blanked. When the measurement is finished, the new value (or an error message) is displayed. If the zero point or the gauge value or both are not yet set, the indicated values are the internal values of Radioactivity-Meter. You cannot use these internal values to see, if the current radioactivity is higher or lower than the recently measured radioactivity. These values are no absolute values.
Before you measure the radioactivity, the smartphone should be a few minutes in the environment or close to the object, you want to meter.
Then tap DETECT to start the measurement process. A progress bar indicates the progress of the measurement process. During the measurement, the indicator area is blanked. When the measurement is finished, the new value (or an error message) is displayed. If the zero point or the gauge value or both are not yet set, the indicated values are the internal values of Radioactivity-Meter. You cannot use these internal values to see, if the current radioactivity is higher or lower than the recently measured radioactivity. These values are no absolute values.
If zero point and gauge value and unit are set, the indicated value is an absolute value, measured in the indicated unit.
Due to the up time dependence of the internal noise, a relaxation time is necessary after each measurement, before the next measurement can be started. Therefore after each measurement a progress bar indicates the period, where no measurement is possible.
If 3 question marks "???" are displayed, no valid value could be calculated. This may sometimes happen due to the stochastic character of the measurement or the radioactivity is too high to be calculated correctly or the current zero point is not really the zero point. If always 3 question marks "???" are displayed and never a value, your smartphone is in principle not suited as radioactivity meter.
If another error message is displayed, it explains the reason and possible actions where required.
You can log each value. Tap MENU and choose LOG IT. To avoid unnecessary repetitions, you can log each measured value only once.
During the measurement process a preview of the camera image is shown above (in portarit mode) or to the left (in landscape mode) of the indicator area. This preview must always be black. If you see any image, the camera lens is not shut and the measurement is meaningless.
Try to perform all the measurements under the same start conditions like ambient temperature (except for the zero point fixing), flight mode on or off etc. Wait a few minutes, additionally to the relaxation time, before you start the next measurement.
Best practice
Regarding the following hints, you will achieve the best results:
Seal the camera lens hermetically to exclude any incident light.
Fix the zero point where really no radioactive radiation is present, in a well shielded container at a well shielded place at a temperature as low as possible, but in any case lower than the temperature of all future measurements.
Try to calibrate Radioactivity-Meter with a gauge value as high as possible by using radioactive samples in universities or public authorities. ATTENTION: Of course, the radiactive radiation must not be too high, to avoid damage of your smartphone!
Place the smartphone before the measurement a few minutes in the environment or close to the object, you want to meter, to enable the smartphone to "adjust" to the radioactive radiation.
Try to perform all the measurements, excect for the zero point fixing, which must be executed at a lower temperature, but including gauge value, under the same start conditions: same ambient temperature, flight mode always on, each measurement at the same up time of the smartphone, e.g. immediately after power-on of the smartphone, do not use the camera before a measurement.
Wait a few minutes after each measurement, before you start the next one.
To get representative measurement results, perform not only one measurement, but measure several times to average over stochastic fluctuations.
Logging
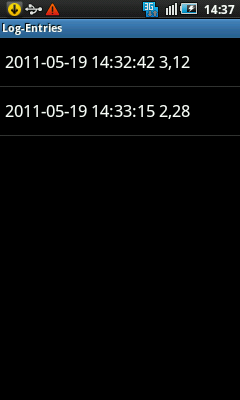 You can log each measured value but only once. Tap MENU and choose LOG IT, to append the measured value to the log list. To open the log list, tap MENU and choose LOGFILE. A list with all stored entries is presented.
Hint: The storage of your smartphone is limited. Therefore delete entries or export them to free memory.
To delete a single entry from the list, tap and hold the entry and choose DELETE.
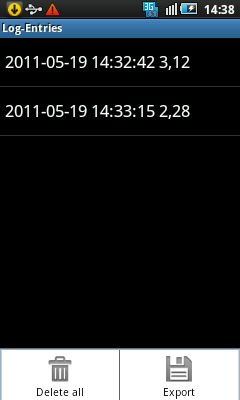 To delete or export all entries, tap MENU in the Log-Entries window. Tap DELETE ALL, to delete all entries from the list. Confirm it and the list will be empty.
Tap EXPORT to export the list to the documents folder of the SD card or internal storage as plain text. The list itself will not be deleted. With the PC software of your smartphone you can transfer the file from the documents folder to your PC.
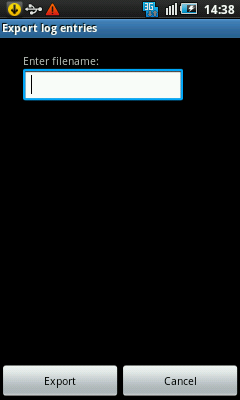 Tapping EXPORT lets you enter the name for the file to be exported. The file will be located in the documents folder of the SD card or internal storage. Tap EXPORT to initiate the export to the folder.